LIgO simulation quickstart
As LIgO is now a part of immuneML, it can be directly used for simulation.
How to run LIgO
You can run LIgO in command line using the following command:
ligo specs.yaml output_folder
Where
specs.yaml — simulation parameters described by the user in a yaml file. Please see YAML parameter details for more information about LIgO parameters.
output_folder — output folder name defined by the user (should not exist before the run).
How to explore LIgO results
The output folder structure is the same for all LIgO runs. The output folder should include:
index.html: main output file which gives an overview of the simulation: link to the full specification, the used LIgO version, some general information on the dataset and the link to the dataset exported in the standard AIRR format
full_specs.yaml file: includes the specification and default parameters if any of the parameters where left unfilled
inst1 folder: this folder name is the same as the name given to the instruction by the user, all results are located here; the simulated dataset is located under inst1/exported_dataset/airr/
HTML_output folder: presentation of figures and reports if specified
How to use LIgO for receptor-level simulation
Simulation of a TCR dataset containing two immune signals
In this quickstart tutorial, we will simulate a dataset of 300 productive TRB receptors — 100 TRBs containing signal 1, 100 TRBs containing signal 2, and 100 TRBs containing no immune signal (background receptors), see the illustration below. Signal 1 consists of a 2-mer {AS} and TRBV7, i.e., only TRBs containing both TRBV7 and 2-mer {AS} contain Signal 1. Signal 2 consists of two gapped k-mers {G.G} and {G..G}. Signal-specific TRBs will be generated using the rejection sampling strategy and the default OLGA model (humanTRB).
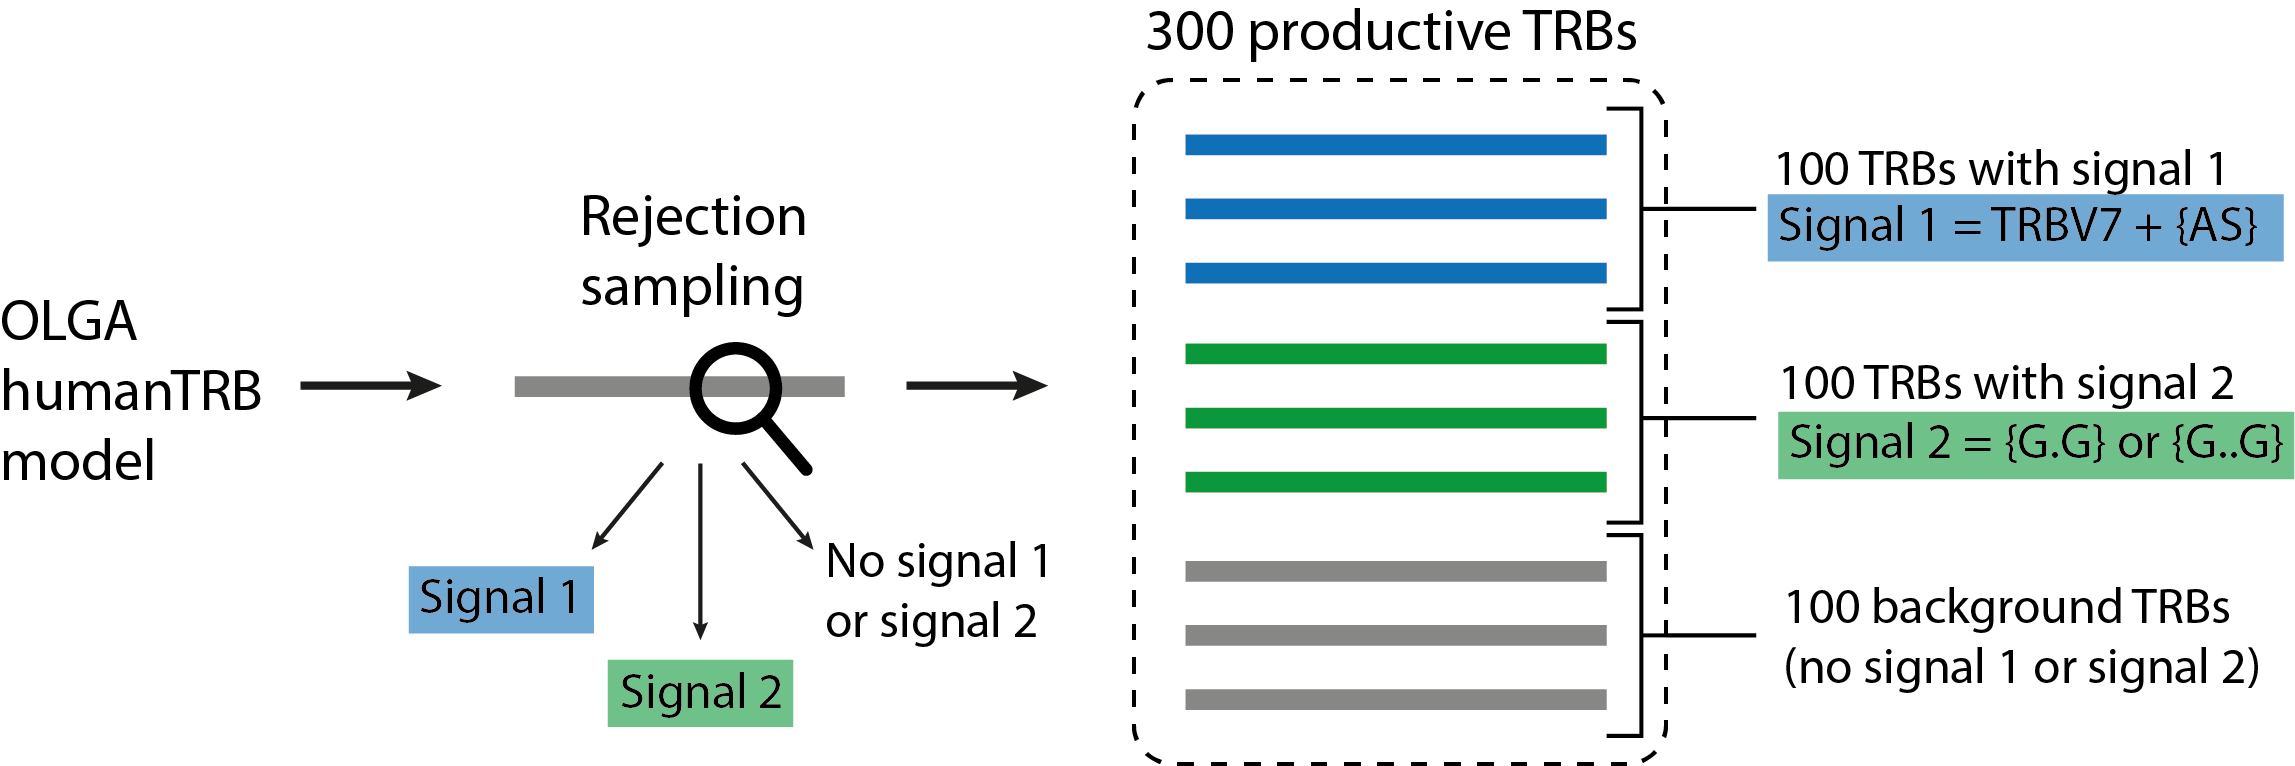
LIgO reports the simulated TRBs as a triple of TRBV gene name, CDR3 AA sequence, and TRBJ gene name. If you also want to report the generation probabilities (pgen) of the simulated receptors according to the default OLGA humanTRB model, set the export_p_gens parameter to true. Please keep in mind that pgen evaluation may take time.
Step 1: YAML specification
We need to define the YAML file describing the simulation parameters.
First, we define the immune signals 1 and 2 in the definitions section.. You can read more about the yaml file parameters in YAML parameter details.
Second, we define the number of TRBs per each signal in the simulations section. You can read more about the yaml file parameters in YAML parameter details.
Finally, we define technical parameters of the simulation in the instructions section. You can read more about the yaml file parameters in YAML parameter details.
Here is the complete YAML specification for the simulation:
receptor_ligo_quickstart.yaml
definitions:
  motifs:
    motif1:
      seed: AS
    motif2:
      seed: G/G
      max_gap: 2
      min_gap: 1
  signals:
    signal1:
      v_call: TRBV7
      motifs: [motif1]
    signal2:
      motifs: [motif2]
  simulations:
    sim1:
      is_repertoire: false
      paired: false
      sequence_type: amino_acid
      simulation_strategy: RejectionSampling
      remove_seqs_with_signals: true # remove signal-specific AIRs from the background
      sim_items:
        sim_item1: # group of AIRs with the same parameters
          generative_model:
            chain: beta
            default_model_name: humanTRB
            model_path: null
            type: OLGA
          number_of_examples: 100
          signals:
            signal1: 1
        sim_item2:
          generative_model:
            chain: beta
            default_model_name: humanTRB
            model_path: null
            type: OLGA
          number_of_examples: 100
          signals:
            signal2: 1
        sim_item3:
          generative_model:
            chain: beta
            default_model_name: humanTRB
            model_path: null
            type: OLGA
          number_of_examples: 100
          signals: {} # no signal
instructions:
  my_sim_inst:
    export_p_gens: false
    max_iterations: 100
    number_of_processes: 4
    sequence_batch_size: 1000
    simulation: sim1
    type: LigoSim
Step 2: Running LIgO
After saving the yaml specification to a file (e.g., quickstart_receptor.yaml), you can proceed with the analysis by following these steps:
Activate the virtual environment where you have installed LIgO, for example
source ligo_env/bin/activate
Navigate to the directory where the yaml specification (quickstart_receptor.yaml) was saved.
Execute the following command:
ligo quickstart_receptor.yaml quickstart_output_receptor
All results will be located in quickstart_output_receptor. Note that the output folder (quickstart_output_receptor) should not exist prior to the run.
Step 3: Understanding the output
The simulated dataset is located under quickstart_output_receptor/inst1/exported_dataset/airr/batch1.tsv. In the output, each row represent one AIR.
Some of the columns are shown in the table below:
v_call |
j_call |
junction_aa |
signal1 |
signal2 |
signal1_position |
signal2_position |
|---|---|---|---|---|---|---|
TRBV10-1*01 |
TRBJ2-5*01 |
CARPDRGGGYTF |
0 |
1 |
m000000000000 |
m000000100000 |
TRBV7-2*02 |
TRBJ2-5*01 |
CASSRGHFQETQYF |
1 |
0 |
m01000000000000 |
m00000000000000 |
TRBV7-8*01 |
TRBJ2-3*01 |
CASSSPGGVRIYSTDTQYF |
1 |
0 |
m0100000000000000000 |
m0000000000000000000 |
Next steps
You can find more information about yaml parameters in YAML parameter details. Other tutorials for how to use LIgO can be found under Tutorials.
How to use LIgO for repertoire-level simulation
Simulation of BCR repertoires labeled with two immune events
In this quickstart tutorial, we will generate a dataset of 20 BCR repertoires, with each repertoire containing 6 BCRs. Out of these, 10 repertoires will be labeled as immune event 1 and will consist of 30% BCRs with signal 1 and 30% BCRs with signal 2. The remaining 10 repertoires will be labeled as immune event 2 and will consist of 50% BCRs with signal 1 and 50% BCRs with signal 2. Signal 1 is composed of a 2-mer {AA}, while signal 2 is composed of a 2-mer {GG}. Signal-specific ИСКыs will be generated using the signal implantation strategy, where any implanting position is allowed, and the default OLGA model (humanIGH).
Step 1: YAML specification
LIgO simulation starts with defining the YAML file with the simulation parameters.
First, we define the immune signals 1 and 2 in the definitions section. You can read more about the yaml file parameters in YAML parameter details.
Second, we define the immune events and the repertoire parameters, such as the number of repertoires and the number of BCRs in therepertoire, in the simulations section. You can read more about the yaml file parameters in YAML parameter details.
Finally, we define technical parameters of the simulation in the instructions section. You can read more about the yaml file parameters in YAML parameter details.
Here is the complete YAML specification for the simulation:
repertoire_ligo_quickstart.yaml
definitions:
  motifs:
    motif1:
      seed: AA
    motif2:
      seed: GG
  signals:
    signal1:
      motifs: [motif1]
    signal2:
      motifs: [motif2]
  simulations:
    sim1:
      is_repertoire: true
      paired: false
      sequence_type: amino_acid
      simulation_strategy: Implanting
      remove_seqs_with_signals: true # remove signal-specific AIRs from the background
      sim_items:
        sim_item: # group of AIRs with the same parameters
          AIRR1:
            immune_events:
              ievent1: True
              ievent1: False
            signals: [signal1: 0.3, signal2: 0.3]
            number_of_examples: 10
            is_noise: False
            receptors_in_repertoire_count: 6,
            generative_model:
              chain: heavy
              default_model_name: humanIGH
              model_path: null
              type: OLGA
          AIRR2:
            immune_events:
              ievent1: False
              ievent1: True
            signals: [signal1: 0.5, signal2: 0.5]
            number_of_examples: 10
            is_noise: False
            receptors_in_repertoire_count: 6,
            generative_model:
              chain: heavy
              default_model_name: humanIGH
              model_path: null
              type: OLGA
instructions:
  my_sim_inst:
    export_p_gens: false
    max_iterations: 100
    number_of_processes: 4
    sequence_batch_size: 1000
    simulation: sim1
    type: LigoSim
Step 2: Running LIgO
After saving the yaml specification to a file (e.g., quickstart_repertoire.yaml), you can proceed with the analysis by following these steps:
Activate the virtual environment where you have installed LIgO, for example
source ligo_env/bin/activate
Navigate to the directory where the yaml specification (quickstart_repertoire.yaml) was saved.
Execute the following command:
ligo quickstart_repertoire.yaml quickstart_output_repertoire
All results will be located in quickstart_output_repertoire. Note that the output folder (quickstart_output_repertoire) should not exist prior to the run.
Next steps
You can find more information about yaml parameters in YAML parameter details. Other tutorials for how to use LIgO can be found under Tutorials.